
Do you feel like this once Christmas is over? There's all this build up for this couple of days and now...I almost don't know what to do with myself.
You mean I don't have to make a million pillowcases? I don't have to cook and cook and cook all kinds of decadent, butter-laden delights? I don't have to scour the Internet for any last minute deals that my kids might pine for? So...now what?
Here's a recap of my holiday weekend...
 My own personal angel. I like the "halo" that is above her head. My favorite part of the reenactment of the Birth of Jesus was my Youngest wearing her angel garb and just singing to her own tune while everything else was going on. We had Herod killing all the boy babies and she was just a singing "Yay Christmas Eve. Yay Christmas, Christmas, Christmas. Christmas is good." And the like.
Another highlight...my nephews performance of Rudolph kills Santa...oh so classically BOY!
 I need to catch up on my Heaven Pie. here it is in all it's glory. Topped with freshly whipped cream and ready to be enjoyed. Rich, rich, rich!!! Just a small piece will do ya.
 The Fam on the Merry morning.
 My Mom is a tease. She realized after having purchased all the Christmas presents for her children that she overbought...FOR ME!!! So a cookbook I would have dearly loved
Became her present, instead of mine...uhhhh...ex-squeeze me? I did use it though and made French Onion Soup for dinner on Christmas. Can I just say YUM!! But, can I also say...LOTS OF WORK!!!
The amount of time it takes to properly caramelize the onions is 2 hours or so. Then you have another hour where you are stirring, stirring, stirring and deglazing. But, if you have the time, definitely make this soup. Very good! Oh, and have somebody else chop the onions. Envision me with tears streaming down my cheeks and Christmas Eve night's mascara running while I attempt to chop 8 onions. There were big time tears. Everybody in the house complained and complained about the strong onion smell..that is until they sat in the oven for 2 hours. Then the complaining stopped pretty darn quick.
Let me just give a quick review of this cook book. It is amazing. I love that for each recipe they explain why it works. Why they did what they did to make it better than all the others. They also give fun tips like...when cutting onions the only thing they found worked was wearing contact lenses or swimming goggles...right then. I can just envision me wearing goggles while chopping onions. not going to happen. They also give funny behind the scenes tidbits like when Christopher Kimball does a tasting each episode, he actually films an entire day of taste tests starting at 8 am and going until late afternoon. 2 taste tests per hour!!! His worst day included: coffee, hot sauce, vanilla extract and mail-order filet mignon. Fun info!
I also like the way the book is organized. For example, they don't just lump beef all together. They give you a section on roasts and a section on one pot dishes and a section on steak. So you really can just be thinking that you want to make a roast and you can decide beef or pork based on their recipes. Even though I only had the chance to make one recipe out of this book, I have made several America's Test Kitchen recipes and I am a huge fan. This book includes every recipe from 2001 to now. I highly recommend it!
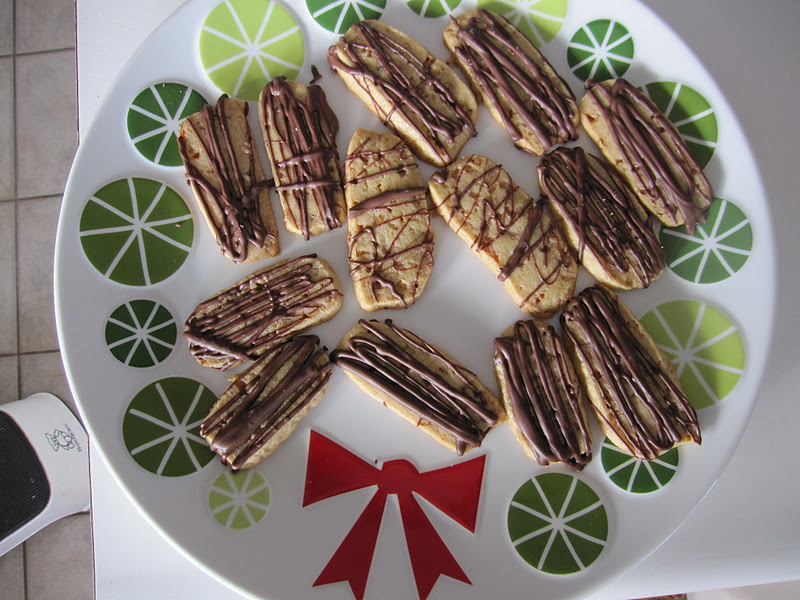
 Speaking of America's Test Kitchen. These are my all-time favorite cookie. Chocolate Toffee Butter Cookies. I make them semi-regularly, and wish I had a batch of frozen dough in my freezer all the time! They are easy, simple, but oh so good. They are subtly delicious. You don't take a bite and pass out from the goodness on the spot...you take a bite and think...nice cookie...then you find yourself eating another bite and then another until you've polished off about 6 cookies in no time flat. And still want more.
They are also the best dunking cookie I've ever had. Hot chocolate, Coffee...Orange juice maybe if you're Mr. Because I Can. So good!
Chocolate Toffee Butter Cookie
Adapted from America's Test Kitchen
2 1/3 C Flour
1/2 tsp baking powder
1/2 tsp salt
2 sticks butter, softened, but still cool...this means straight from the fridge and about 10 seconds in the microwave for me
1 C packed brown sugar
1 egg
1 tsp vanilla
1 C. Heath Toffee Bits...they recommend without chocolate, but let me say I love them both ways. If I have the toffee bits with chocolate, I just don't drizzle chocolate on at the end. If I have the plain toffee bits, I do like little chocolate razzle dazzle at the end. Both are good!
1/2 C. chocolate snaps (these are disks of chocolate that do not need to be tempered. Similar to almond bark, but I like Callebaut brand, no surprise there)
Adjust oven racks to upper middle and lower middle positions.
Heat oven to 350
Combine flour, baking powder and salt in bowl. Set aside
In mixer with paddle attachment, beat butter and brown sugar on medium speed for approximately 3 minutes until fluffy. Add egg and vanilla and beat until combined.
Reduce speed to low and add flour combo in two additions. Mix until just combined.
Add toffee bits. Mix until combined.
Divide dough in two. Roll each piece into a log that's approximately 9 inches long. Then smoosh
Line two baking sheets with parchment.
Using a chef's knife, cut dough into 1/4 inch cookies. They will look quite thin.
Place on cookie sheets. They don't spread too much due to the chilling, I can usually get around 21 cookies per cookie sheet. So 3 across and 7 down.
Bake 10-12 minutes until the edges are just lightly browned...make sure you rotate your cookie sheets half way through the baking.
Cook completely on baking sheet.
Once cool, melt your chocolate in a micro-wave proof bowl, I use my Pyrex measuring cups, about 30 seconds at a time until melted. Drizzle to your heart's content.
YUM! Really, I don't put a recipe in this blog unless it is stellar. Make this and find your cookie true love.
You mean I don't have to make a million pillowcases? I don't have to cook and cook and cook all kinds of decadent, butter-laden delights? I don't have to scour the Internet for any last minute deals that my kids might pine for? So...now what?
Here's a recap of my holiday weekend...

Another highlight...my nephews performance of Rudolph kills Santa...oh so classically BOY!


Became her present, instead of mine...uhhhh...ex-squeeze me? I did use it though and made French Onion Soup for dinner on Christmas. Can I just say YUM!! But, can I also say...LOTS OF WORK!!!
The amount of time it takes to properly caramelize the onions is 2 hours or so. Then you have another hour where you are stirring, stirring, stirring and deglazing. But, if you have the time, definitely make this soup. Very good! Oh, and have somebody else chop the onions. Envision me with tears streaming down my cheeks and Christmas Eve night's mascara running while I attempt to chop 8 onions. There were big time tears. Everybody in the house complained and complained about the strong onion smell..that is until they sat in the oven for 2 hours. Then the complaining stopped pretty darn quick.
Let me just give a quick review of this cook book. It is amazing. I love that for each recipe they explain why it works. Why they did what they did to make it better than all the others. They also give fun tips like...when cutting onions the only thing they found worked was wearing contact lenses or swimming goggles...right then. I can just envision me wearing goggles while chopping onions. not going to happen. They also give funny behind the scenes tidbits like when Christopher Kimball does a tasting each episode, he actually films an entire day of taste tests starting at 8 am and going until late afternoon. 2 taste tests per hour!!! His worst day included: coffee, hot sauce, vanilla extract and mail-order filet mignon. Fun info!
I also like the way the book is organized. For example, they don't just lump beef all together. They give you a section on roasts and a section on one pot dishes and a section on steak. So you really can just be thinking that you want to make a roast and you can decide beef or pork based on their recipes. Even though I only had the chance to make one recipe out of this book, I have made several America's Test Kitchen recipes and I am a huge fan. This book includes every recipe from 2001 to now. I highly recommend it!
They are also the best dunking cookie I've ever had. Hot chocolate, Coffee...Orange juice maybe if you're Mr. Because I Can. So good!
Chocolate Toffee Butter Cookie
Adapted from America's Test Kitchen
2 1/3 C Flour
1/2 tsp baking powder
1/2 tsp salt
2 sticks butter, softened, but still cool...this means straight from the fridge and about 10 seconds in the microwave for me
1 C packed brown sugar
1 egg
1 tsp vanilla
1 C. Heath Toffee Bits...they recommend without chocolate, but let me say I love them both ways. If I have the toffee bits with chocolate, I just don't drizzle chocolate on at the end. If I have the plain toffee bits, I do like little chocolate razzle dazzle at the end. Both are good!
1/2 C. chocolate snaps (these are disks of chocolate that do not need to be tempered. Similar to almond bark, but I like Callebaut brand, no surprise there)
Adjust oven racks to upper middle and lower middle positions.
Heat oven to 350
Combine flour, baking powder and salt in bowl. Set aside
In mixer with paddle attachment, beat butter and brown sugar on medium speed for approximately 3 minutes until fluffy. Add egg and vanilla and beat until combined.
Reduce speed to low and add flour combo in two additions. Mix until just combined.
Add toffee bits. Mix until combined.
Divide dough in two. Roll each piece into a log that's approximately 9 inches long. Then smoosh
Line two baking sheets with parchment.
Using a chef's knife, cut dough into 1/4 inch cookies. They will look quite thin.
Place on cookie sheets. They don't spread too much due to the chilling, I can usually get around 21 cookies per cookie sheet. So 3 across and 7 down.
Bake 10-12 minutes until the edges are just lightly browned...make sure you rotate your cookie sheets half way through the baking.
Cook completely on baking sheet.
Once cool, melt your chocolate in a micro-wave proof bowl, I use my Pyrex measuring cups, about 30 seconds at a time until melted. Drizzle to your heart's content.
YUM! Really, I don't put a recipe in this blog unless it is stellar. Make this and find your cookie true love.
Heather


